The YouTube Shorts aspect ratio is 9:16 vertical, with 1080 × 1920 pixels as the recommended resolution. That format fills a smartphone screen cleanly, but it isn't the whole story because YouTube can also classify some square and other eligible vertical uploads as Shorts.
You've finished editing, exported the video, and opened the upload screen. Then you notice the footage was shot in wide format, the captions sit close to the bottom edge, and you're no longer sure whether the file is genuinely a Short or just a small regular YouTube video. That uncertainty is common, especially when a clip has been adapted from another platform or passed through a social media scheduler.
The practical answer is simple: build your master project at 9:16 and 1080 × 1920 whenever you can. The production decision is more important than memorising a single specification, because the frame controls how faces, product details, subtitles and screen recordings appear on a phone.
You'll also need to separate two ideas that are often mixed together. 9:16 is the best display format, while YouTube's classification rules can be broader. A square upload may still qualify, and a longer vertical window is now available under updated Shorts policy. The sections below cover the format, resolution, classification, safe framing, repurposing and scheduler hand-off. For a wider reference covering multiple platforms, you can also compare social media video formats before creating a reusable export preset.
Table of Contents
- Why the YouTube Shorts Aspect Ratio Matters Before You Hit Upload
- The Core 9 - 16 Vertical Standard Explained
- Resolution, Frame Rate and Codec Numbers Worth Knowing
- How YouTube Actually Detects a Short
- Safe Framing Inside the 9 - 16 Frame
- Repurposing Landscape and Square Clips Without Losing Readability
- Preparing Vertical Media for a Social Scheduler
- Quick Pre-Publish Checklist and What Comes Next for Shorts Specs
Why the YouTube Shorts Aspect Ratio Matters Before You Hit Upload
A frame that looks fine on your editing monitor can feel cramped or strangely padded on a phone. A horizontal clip placed inside a portrait player may show empty areas, while an automatic crop can remove the speaker's face, a product label or the first word of a caption. The result isn't just a cosmetic problem. Viewers have to work harder to understand the image, and the video may feel less native to the Shorts feed.
Start with the viewing device, not the source file. A Short is normally consumed on a portrait smartphone screen, so a vertical frame gives the subject more usable space and avoids asking the viewer to rotate the device or look past unused borders. If your source footage is horizontal, you need to decide whether to crop it, move the frame as the subject speaks, stack multiple views or preserve the original image inside a designed background.
The four checks that prevent avoidable mistakes
Before you upload, confirm four separate things:
- Canvas: Your project is vertical rather than a landscape sequence with a portrait crop applied at the end.
- Resolution: Your delivery file uses 1080 × 1920 pixels, the commonly recommended Full HD portrait size cited in UK guidance on YouTube Shorts dimensions.
- Framing: Faces, important objects and text remain visible after the player adds its interface.
- Classification: The duration and shape make the upload eligible under YouTube's current Shorts rules.
That last point matters because a technically vertical-looking edit can still contain a wide canvas, padded artwork or text positioned for a different platform. Check the actual export properties, then inspect the uploaded preview on a phone. A scheduler can pass along a file, but it can't rescue a poor crop or a caption hidden beneath interface controls.
Production rule: Treat 9:16 as the design target, then treat Shorts eligibility as a separate upload check.
The Core 9 - 16 Vertical Standard Explained
An aspect ratio describes the relationship between a frame's width and height. 9:16 means nine units wide for every sixteen units high, so the image is taller than it is wide. At 1080 × 1920 pixels, the calculation is the same: 1080 units across and 1920 units down.
Traditional YouTube video commonly uses 16:9, where the frame is wide. If you place that shape inside a portrait phone display, you must either preserve the whole image with unused space around it or enlarge it until the sides disappear. A native 9:16 project avoids that compromise because its proportions match the way a phone is normally held for Shorts.
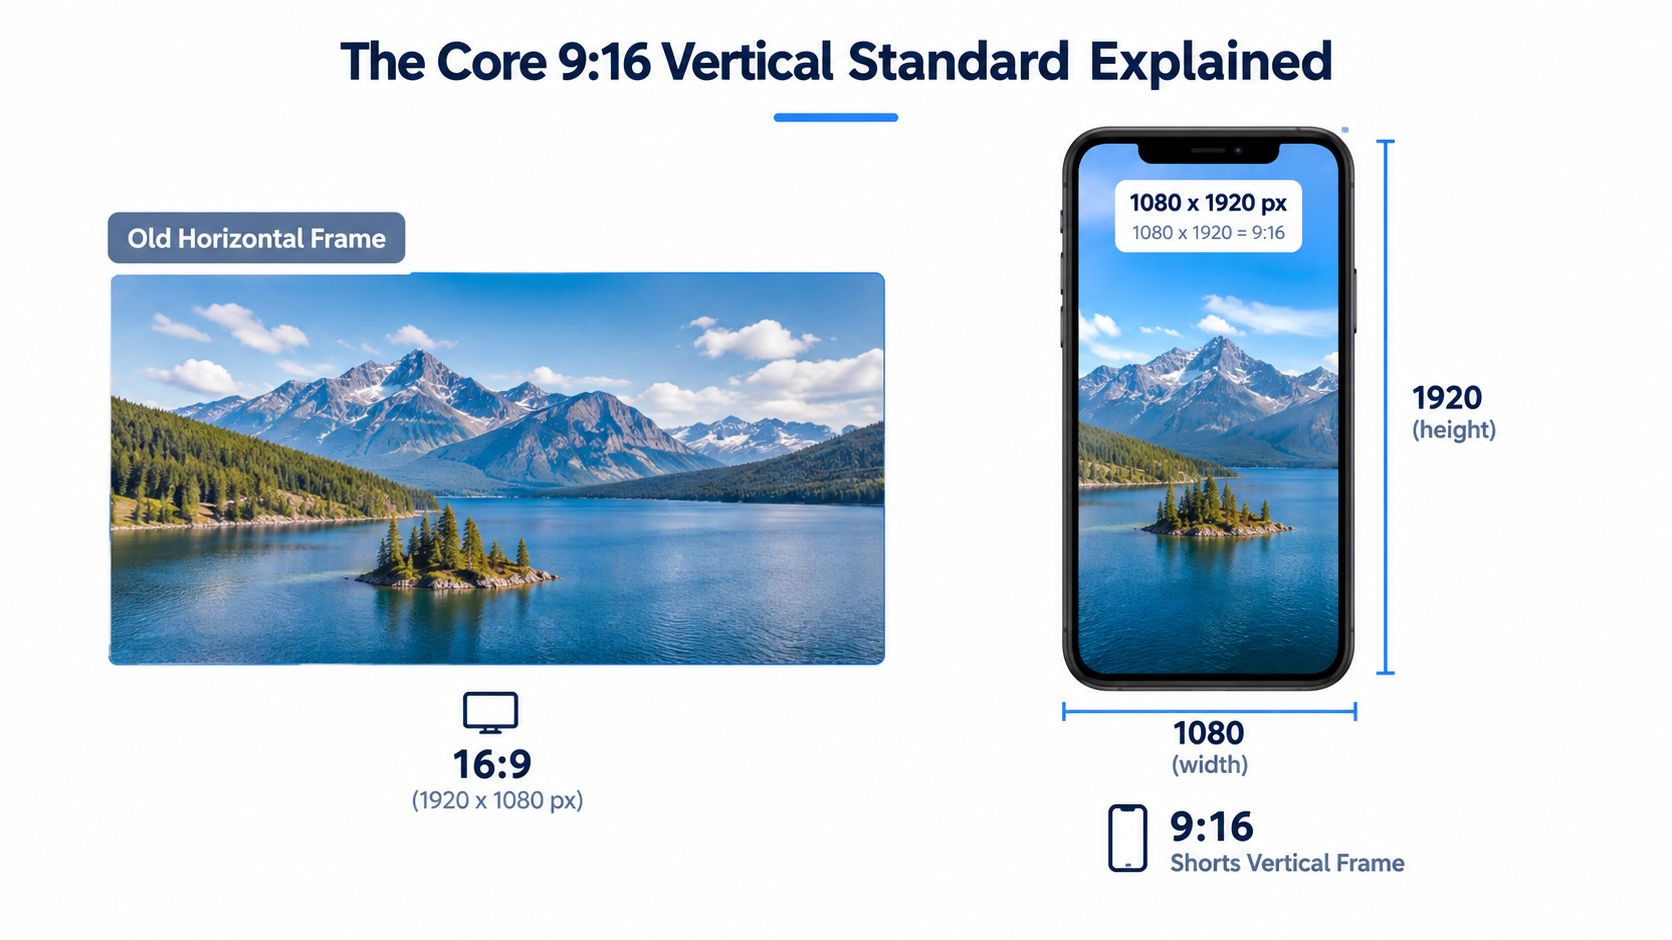
The 1080-pixel width gives text and fine detail enough room for a clear mobile export, while the 1920-pixel height lets the video occupy the portrait viewport from top to bottom. It also gives you a predictable working area for captions, logos and subject placement. YouTube can classify eligible square or vertical files that aren't exactly 9:16, but those files won't use the screen as efficiently as a full portrait composition.
Build the project around the phone
Create the sequence at 1080 × 1920 before adding overlays. Then place the speaker, demonstration or product inside that tall frame. This approach is safer than editing in 16:9 and asking an automated crop to make every decision at the end.
If you regularly adapt one master video for several channels, keep the original widescreen edit separate from the Shorts sequence. Tools designed to reframe videos for TikTok and Reels can help with the mechanical conversion, but the editorial choice still belongs to you. A crop that works for a centred talking head may fail completely when the important action happens at the edge of a wide shot.
Resolution, Frame Rate and Codec Numbers Worth Knowing
The most useful export settings are the ones you can verify in your editing software before the file reaches a scheduler. Use 1080 × 1920 pixels as the practical delivery target. UK technical guidance identifies 720 × 1280 pixels as a lower resolution reference and 256 GB as a file-size ceiling cited in creator guidance, while YouTube's Shorts policy now allows eligible videos up to three minutes. These figures describe different concerns, so don't treat the file-size ceiling as a reason to export unnecessarily large files.
The brief's technical references don't establish a universal frame-rate, codec, container, duration or bitrate specification for every Shorts upload. Avoid turning a production preference into a platform rule. Choose settings that your editor, scheduler and playback devices handle reliably, then check the resulting file rather than assuming the preset is correct.
| Specification | Recommended value | Why it matters |
|---|---|---|
| Canvas | 1080 × 1920 pixels | Provides a clear portrait delivery target for a full-screen phone presentation. |
| Aspect ratio | 9:16 vertical | Matches the dominant mobile viewing shape and gives you a consistent design area. |
| Lower resolution reference | 720 × 1280 pixels | Offers a smaller vertical baseline when a lighter file is necessary. |
| Shorts policy window | Up to three minutes for eligible videos | Gives creators more flexibility than the earlier shorter-form limit. |
| File-size ceiling cited in UK guidance | 256 GB | Sets an upper boundary mentioned in creator guidance, not a recommended export size. |
The key distinction is between eligibility and quality. A file may meet YouTube's shape requirements while still looking soft, carrying unreadable text or arriving at the scheduler with unwanted padding. Export a short test file, upload it privately if needed, and review it on an actual phone before you commit to a batch workflow.
How YouTube Actually Detects a Short
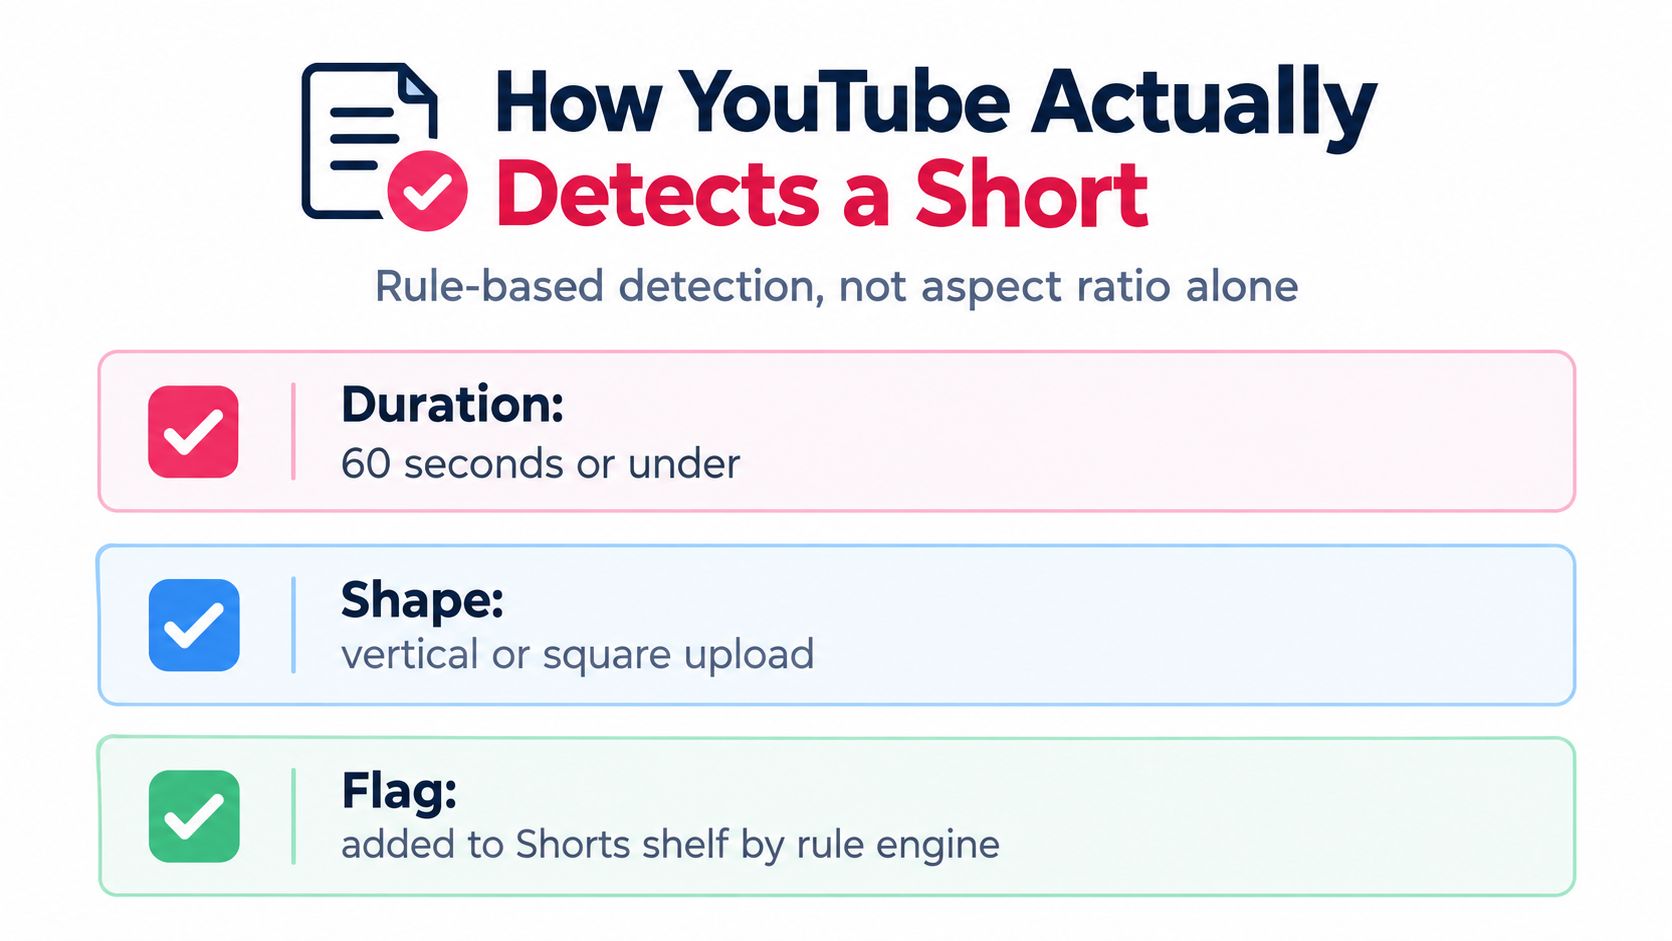
YouTube's current policy no longer makes the answer as narrow as “the file must be exactly 9:16”. Eligible square or vertical uploads can be classified as Shorts, and UK-focused guidance records the expanded policy for uploads after 15 October 2024. The format target remains 9:16 because it presents best on a portrait screen, but classification and presentation are separate decisions.
That means a square file can count even though it doesn't fill the phone in the same way as a portrait file. A vertical upload can also qualify without matching every pixel of the 1080 × 1920 target. The practical test is whether the file fits YouTube's current Shorts rules, including the relevant duration and orientation requirements.
Why classification shouldn't replace good composition
A square upload may be accepted, yet it can leave unused space in the Shorts player. That space changes how large the subject and captions feel, particularly when the original edit was designed around a 1:1 feed tile. A 9:16 master gives you control over the full portrait composition instead of relying on the platform to present a smaller shape inside its player.
Check the uploaded result in the Shorts viewing experience, but don't use one interface cue as your only test. Platform presentation and policy details can change, while your source file remains fixed. Keep the project dimensions, duration and crop visible in the export record so you can diagnose a result without guessing.
Safe Framing Inside the 9 - 16 Frame
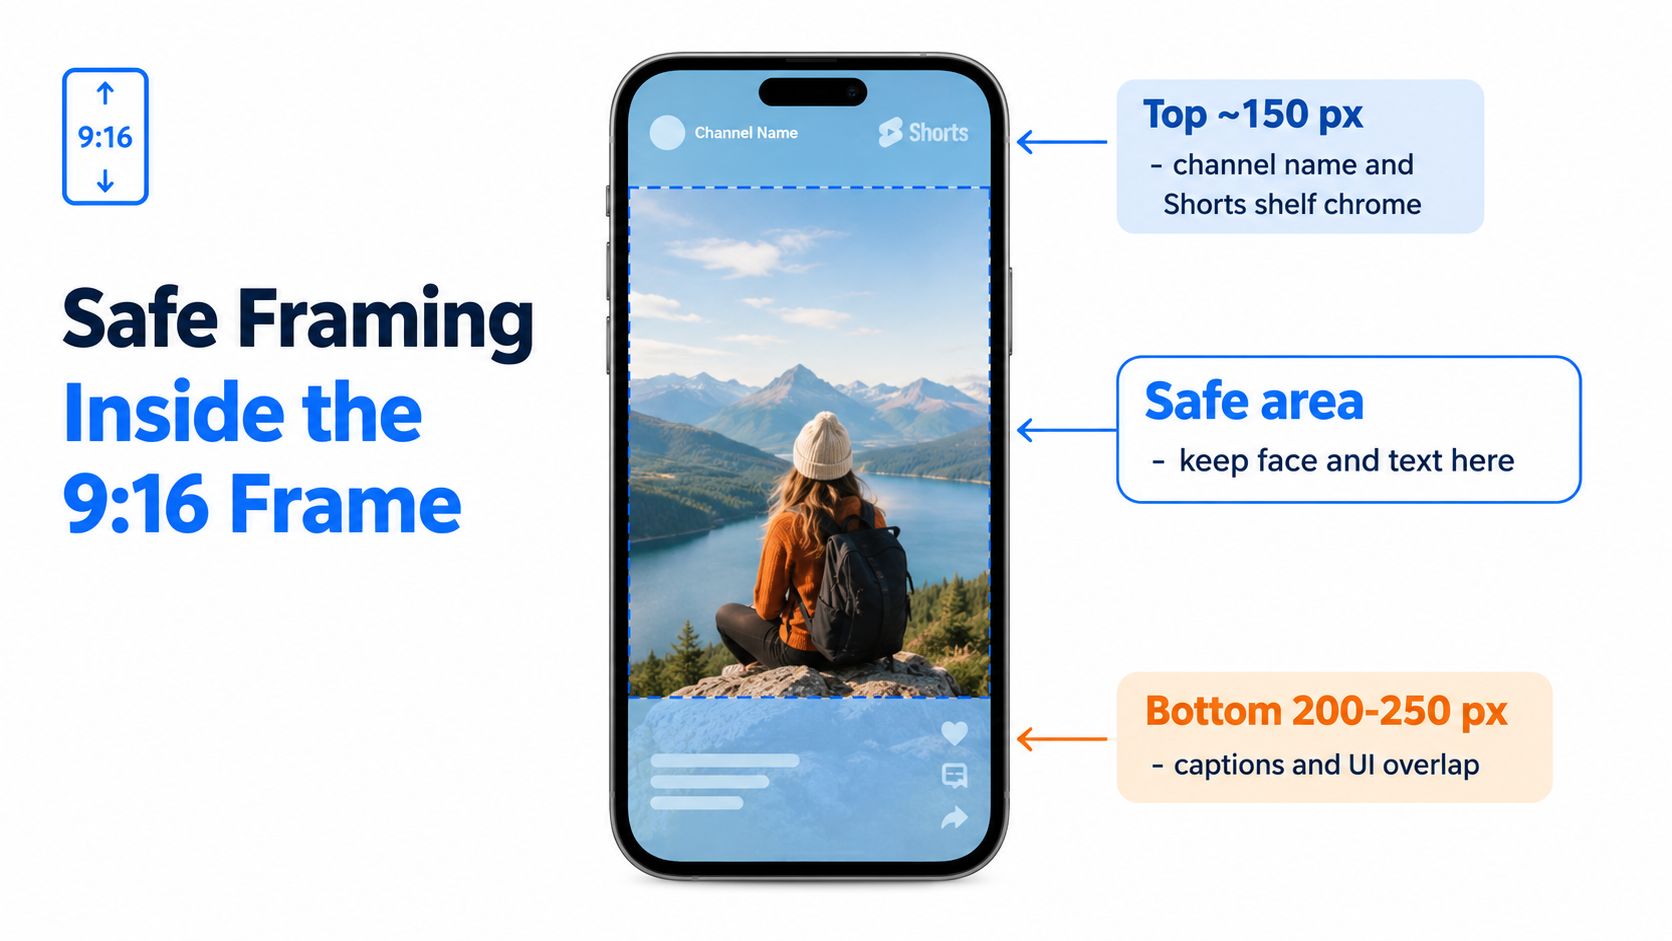
A 1080 × 1920 canvas gives you a tall stage, but the viewer doesn't see every pixel without interruption. YouTube places channel information, captions, buttons and other interface elements over the viewing area. If you put a lower third at the very bottom, the platform's controls can compete with it or cover it.
Use guides while you edit rather than shifting graphics after export. The supplied framing guidance identifies a top area of roughly 150 pixels and a lower area of about 200 to 250 pixels where interface elements commonly create risk. Those aren't permanent platform guarantees, so use them as working margins and inspect your own upload.
A practical guide layer
Create a transparent guide on top of your sequence:
- Top margin: Keep essential text below approximately y=150 on a 1920-pixel-high canvas.
- Bottom margin: Keep subtitles, watermarks and calls to action above approximately y=1670 to y=1720, depending on how much lower clearance you want.
- Central action area: Place the face, product or demonstration near the middle of the frame, where overlays are less likely to interfere.
- Text width: Leave side breathing room as well as top and bottom clearance, especially for long captions.
A centred face is usually easier to protect than a wide group shot. For a screen recording, enlarge the important panel and move it into the central viewing area instead of showing an entire desktop at a scale that becomes unreadable on a phone.
Safe-zone habit: Preview the finished Short at phone size before judging whether the caption is large enough. A graphic that looks generous on a desktop timeline may become tiny after the player surrounds it with interface controls.
Repurposing Landscape and Square Clips Without Losing Readability
A horizontal master contains more width than a 9:16 frame can show. The correct conversion depends on what the viewer must understand. A close-up interview may survive a centre crop, while a product demonstration with labels at both sides needs a moving crop or a redesigned layout.
For a 16:9 clip, a tight centre crop is quick but removes edge detail. A pan-and-scan crop follows the speaker or object and preserves more of the story, though it needs keyframes and can feel distracting when the movement is abrupt. A stacked layout can show two wide clips at once, but each source becomes smaller. A blurred background fill keeps the complete original image visible behind a portrait window, yet fine detail may still be too small for a phone.
Square footage needs a different warning. YouTube may classify a 1:1 upload as a Short, but captions and lower thirds designed for a square feed can sit too low or too close to the player controls when the file appears inside a taller interface. A 4:5 source offers more height than square footage, but it still doesn't give you the same full-screen composition as 9:16.
| Source format | Reframe method | What stays readable | What you lose |
|---|---|---|---|
| 16:9 interview | Centre crop | A centred speaker and simple background | People or text near the edges |
| 16:9 demonstration | Pan-and-scan | The active subject as it moves | Some surrounding context and editing time |
| 16:9 dual shot | Split-screen stack | Two related views with short labels | Image size and visual simplicity |
| 16:9 presentation | Blurred background fill | The complete original frame | Some detail because the source remains smaller |
| 1:1 square | Rebuild on a 9:16 canvas | Central subject and redesigned captions | The original square placement |
| 4:5 portrait | Crop or extend the canvas | More vertical action than square footage | Peripheral detail outside the portrait window |
Open the result on a phone at a reduced preview size, around 25 percent of the editing view, and ask whether the product label, face and caption remain clear. If your workflow also creates assets for Instagram, keep the platform-specific dimensions documented alongside the project, using this Instagram video size reference rather than applying one crop everywhere.
Preparing Vertical Media for a Social Scheduler
A scheduler should receive a finished vertical file, not an unfinished project that still depends on platform-side cropping. Start by creating a dedicated sequence at 1080 × 1920, with square pixels and the frame rate used by your source footage. Keep the project consistent across the team so an editor, reviewer and publisher are all checking the same canvas.
The exact bitrate, audio target, codec and container choices in the supplied brief aren't verified platform facts, so don't present them as universal YouTube requirements. In practice, choose a widely compatible export supported by your editing application and scheduler, then confirm that the hand-off hasn't added borders, changed the crop or replaced the file with a thumbnail preview.
A clean hand-off routine
- Name the project clearly. Include the channel, subject, duration and crop in the filename, such as
YT-SHORT-product-demo-vertical. - Export the complete file. Don't upload a proxy, review render or low-resolution preview.
- Inspect the file properties. Confirm the dimensions show a portrait canvas and that the video opens correctly before importing it.
- Upload a test when changing presets. A private or unlisted test can reveal padding, caption movement or an unexpected transcode.
- Review the scheduled preview. Look for the actual frame, readable text and correct audio, not just a generated thumbnail.
| Setting | Recommended value |
|---|---|
| Project canvas | 1080 × 1920 pixels |
| Pixel shape | Square pixels |
| Orientation | Vertical 9:16 |
| Container | A format supported by your editor and scheduler |
| Video and audio encoding | A compatible combination verified by a short test upload |
| Filename | Include YT-SHORT, subject and crop description |
| Final review | Check the scheduler preview and the published mobile view |
When choosing an editor for this workflow, compare features such as responsive canvases, caption controls and batch exports in a guide to the best software for YouTube videos. Once your file is ready, a YouTube scheduling workflow can handle the publishing step, but the scheduler can't decide whether a crop has removed the information your audience needs.
Quick Pre-Publish Checklist and What Comes Next for Shorts Specs
Use the final review to test the file, not to reopen every creative decision. Check the dimensions first, then inspect the shape, duration, text margins and phone preview. YouTube's policy has expanded to allow eligible Shorts up to three minutes, so don't apply an older, shorter assumption to every upload. The important question is whether the current file meets the current rule and still works as a mobile viewing experience.
Run these checks in order:
- Canvas: Confirm the export is 1080 × 1920 pixels when 9:16 is the intended presentation.
- Shape: Verify that the file is vertical, rather than a horizontal sequence placed inside a portrait project.
- Duration: Check the timeline against the current Shorts policy window.
- Eligibility: Remember that square and other eligible vertical files may qualify, but they won't necessarily use the screen as effectively.
- Safe framing: Keep the face, product, headline and key movement away from the top and bottom interface areas.
- Captions: Read every subtitle on a phone, including text over bright or moving footage.
- Scheduler preview: Confirm that the uploaded media is the actual video, with no unexpected padding or crop.
The interface around a Short can change, so keep your guide layer adjustable rather than treating any pixel boundary as permanent. Review your preset periodically, especially after an editor, scheduler or YouTube player update. If timing is part of your distribution plan, use a channel-specific planning reference such as best times to post on YouTube, then judge the published result by its actual mobile presentation.
Final check: If a viewer can identify the subject, read the essential caption and understand the action without zooming or rotating the phone, your export is doing its job.
Scheduler.social helps you plan, adapt, approve and publish vertical video from one visual content calendar, so your YouTube Shorts files can move from a verified export to a scheduled post without repeated manual uploads. Visit Scheduler.social to organise channel-ready media, coordinate reviews and keep your Shorts workflow consistent.